Wednesday, November 23, 2011

Shortbread: Part 2- Chocolate Shortbread

Chocolate Shortbread


I love shortbread cookies. I especially love a really nice chocolate shortbread cookie. This is an original recipe (invented by me!). Drool over the picture, but bake up a batch and eat some too!


RECIPE
1/2 Cup Flour
2 Tbs Cocoa Powder
1 ounce Dark Chocolate, Chopped
3 TBS water
1 Tbs sugar + 2Tbs coarse Sugar

Set an oven proof bowl over a pan of boiling water. Add chopped chocolate, and melt, stirring constantly. Once melted, remove from heat and allow to cool slightly. Meanwhile, in a bowl, whisk together flour, cocoa powder and 1 Tbs Sugar. Whisk in butter, as shown. Whisk in chocolate, as shown. form dough into a ball. Roll out to 1/2" thickness, Press Coarse sugar into dough, cut as desired.

SERVING SIZE
Makes 1 dozen 3" cookies

OTHER FLAVORS: You can use these cookie for ganache sandwiches, ice cream sandwiches, crumbled into pie crust, or press dough into a tart pan for an easy and delicious crust. Form dough into small balls, press with thumb to flatten- fill with Jam or a chocolate kiss.

Tuesday, November 22, 2011

Shortbread: Part 1- Traditional Shortbread


My Favorite Traditional Shortbread

Vesratile Cookie Recipe Great for the Holidays!


With The Holidays So Close...

You may be looking for some simple no fuss recipe to help you to get the WOW you want with out too much work or brainpower... right?

This simple and tasty cookie recipe might be just the thing you were looking for.

In the past, this shortbread/ butter cookie recipe has worked well and can be used in a few different ways. it is great plain or topped with "sanding sugar" or formed into jam filled thumbprints. You can add Flavors to the dough, such as nuts, or chocolate, or even herbs (i like lavender a lot). See "Other Flavors" section below for more ideas. I have also used this recipe as a tart crust for a delicious and easy tart.

RECIPE
1 1/4 Cup Flour
3 Tbs Sugar
1/2 Cup butter

Whisk together flour and sugar in a bowl. Cut cold butter into flour till well combined, Should resemble wet sand. Form Dough into a ball, knead till smooth, about 1 minute. Form a square log shape and roll into 1/2" thickness. Cut into even pieces. Press coarse sugar onto dough. Arrange on a cookie sheet and bake at 300* till golden, about 30 minutes.

 OTHER FLAVORS: Once you have this dough made, you can shape and bake it in almost any for you like. use cookie cutters, mini tart pans, etc. One nice way to use this dough is to make thumbprint cookies; just shape the dough into small balls, and flatten with your thumb, this will leave an impression, which you can then fill with your favorite jam, like raspberry, or a chocolate kiss. You can also combine your creative additions to this such as ground nuts (1/4 cup), or Herbs (2 TBS). 

Tune in Tomorrow for another variation of this recipe!

Monday, November 21, 2011

Pumpkin Pie: A Thanksgiving Tradition, From A Fresh Pumpkin!


Pumpkin Pie

First You Take a Fresh Pumpkin...


Then you make a pie!


    So, when i was growing up, i absolutely HATED pumpkin pie. i could never figure out why so many people liked it so much! It was heavy, way too sweet, and always gave me a stomach ache. After i grew and started making Thanksgiving dinners myself, I decided to try making pie with a fresh pumpkin. They are so cute in the store, irresistible not to buy. So i tried it and i discovered that i love Pumpkin pie. I think it was the awful can all along that i hated.
    This is my recipe for pumpkin pie. No refined sugar, no harsh flavors, just a gently spiced, naturally sweetened pumpkin pie. It took a lot of experimenting over many holidays to get this recipe just the way i like it. I hope you like it too.


RECIPE:
Pumpkin Pie From Scratch
For Crust: (slideshow recipe shows 1 crust proportions)
1 1/2 Cup flour
1/2 tsp salt
6 tbs cold butter
5 tbs ice water
     whisk flour and salt together. add in cold butter. cut together with a knife, pastry cutter, or food processor. add water, gently stir together with a fork. form a ball and refridgerate till ready to use.

For Pumpkin Pie Filling:
1  small pumpkin pureed
1 tsp fresh ground cinnamon
1 tsp fresh grated ginger
1/2 tsp fresh grated nutmeg
1 cup half and half
3 eggs
3 tbs grade b maple syrup
1/4 cup honey
1/2 cup brown sugar
    Prep pumpkin and puree as shown. put puree into large heavy saucepan over medium heat. Mix in all ingredients and heat, stirring constantly for 3 minutes. Remove from heat. Roll out dough as shown. Pour puree into prepared pie crust and bake at 375* for about 30-40 minutes or until set. cool, serve

SERVING SIZE: Makes 2 Pumpkin pies.

Tune in tomorrow!


Sunday, November 20, 2011

Apple Cake: What to Do with Apples That Hang Around Too Long


Apple Cake

An Easy Take-Along For The Holidays!


   It happens to me every fall, i buy more apples than i can eat, and then i end up with a couple of apples that are too soft to eat or make pie out of, but too pretty to throw out. It took me a lot of searching, and then some experimenting, but i have developed this cake recipe as a solution to the "old apple" problem.
   This recipe stars whole wheat as the only flour in the recipe, but your friends will never know it. i have also included my recipe for my special Cinnamon Caramel Glaze that makes a great warm topping for this cake.
   Please give this easy recipe a shot, impress your friends! This would be a super recipe to take to a holiday party or family gathering!


RECIPE
Apple Cake:

3/4 whole wheat flour
1 tsp cinnamon
1/2 tsp baking soda
1/4 tsp salt

3/4 cup sugar
1 stick of butter, melted and cooled
2 eggs

2 apples, ripe and diced into very small dices (peeled if you prefer, but it doesn't matter)
1/2 cup walnuts, coarsely chopped

    Prepare an 8"X8" pan with butter and flour, as shown. Preheat oven to 350*. In a bowl, whisk flour, cinnamon, baking soda and salt together, set aside. In a separate bowl, mix sugar and eggs. Add butter, beat at medium speed till fluffy like frosting. Gently add in flour mixture using a spoon or low mixing speed, just till combined. Gently fold in apples and nuts till coated. Spread batter evenly into prepared pan. Bake about 25-30 minutes, or till golden brown and toothpick comes out clean. Cool at least 20 minutes before cutting or glazing.

Cinnamon Caramel Glaze
1/4 cup water
1/2 cup sugar
2 Tb butter
1 tsp cinnamon
1 egg yolk

Heat all ingredients together in a large heavy saucepan over medium-high heat, stirring constantly. Heat to boil. Boil 1 minute, continuing to stir. Remove from heat, allow to cool. Spread over finished cake.

SERVING SIZE:  Makes one glazed 8"X8" Square cake, suitable for 9 servings.

OTHER FLAVORS:  The addition of vanilla to the cake batter is optional. This would also turn out fine with out nuts, with pecans, or with all purpose flour (change amount to 1 cup). If you are short on butter, you can substitute half the butter in the batter for oil.

CHEAPER: Skip the glaze. Make into Muffins (fill cups 3/4 full) for portioned breakfast or snack to-go treats.

FASTER: This cake is pretty fast, the most time consuming part is the chopping of the apples. perhaps a food processor would help.

HEALTHIER: substitute any healthful oil for butter in the batter. Skip the glaze. This cake is a treat, so its not really gonna be all too healthy, but it's not the worst thing you could have either. :p

Friday, November 18, 2011

Fresh Salsa: Pico De Gallo


Salsa: Pico De Gallo

One Hot Habanero


    Hello everyone! Boy, it's been a while hasn't it? My apologies! Here is a recipe oft requested.... Fresh Salsa. This is a recipe i learned from my grandma. In the summer months where i grew up, she would have a garden of tomatoes ripe and ready- and she would pull out her old heavy stone molcajete to grind it together.  She said that her mother gave it to her when she got married, along with a traditional terra cotta bean pot, rolling pin, and cast iron Colmal (flat pan for cooking tortillas) Anyway, This is a family recipe that i'm delighted to share with you all.
    The photos came about for this post after i moved. I live in a strange place where authentic foods are seemingly hard to find. I tried a salsa here that may have been one of the worst i ever had. So i decided to make my own. This recipe can be a tiny bit time consuming, so i don't make it as often as i would like to. it's not complicated, just a lot of chopping. You can use a food processor if you have one, but try to mince or dice rather than liquify the ingredients for a hearty texture.

     What to use salsa for?
    Well, I sorta doubt anyone would really ask this question, but I wanted to share some of my favorite uses for salsa anyway. Of course you can serve salsa with your favorite tortilla chips. I love to have my morning omelette rolled with salsa inside. I have also really liked making corn quesadillas with a dab of salsa inside. You can top your tostadas with it, as shown in the blog post here.  A favorite snack of mine lately has been homemade nachos, which is simply chips with grated cheddar, a bit of salsa, tucked under the broiler for a few minutes. So many more uses! 
    An additional note: I made this batch using one very hot habanero pepper. Please take care when chopping spicy peppers! The hot oils could penetrate delicate skin and cause intense burning for some people. I've seen this happen once and it was rather traumatic. If you feel your skin may be delicate, wear gloves. Also, if your knife isn't incredibly sharp you also risk squirting pepper juices into your eyes. Please be careful if this is the case. 


RECIPE:
1 lb Roma tomatoes, peeled or 1.25 lbs of your favorite seasonal tomatoes
1/2 of a large yellow onion
1/4 bunch of fresh cilantro
2 large cloves of garlic
1 Habanero pepper*
1 lime or 1/2 lemon Juiced; or 1 tsp vinegar
1/2 tsp salt, more to taste

Chop all ingredients as shown.Add lime juice and salt.  Mix together well. Move to an airtight container and allow to sit in the fridge for at least 4 hours. Taste, and adjust seasoning. Enjoy with chips or on your favorite foods.
SERVING SIZE: Makes One Pint, Lasts in the fridge for about 2  weeks.  

 *OTHER FLAVORS: You can make this recipe as hot or mild as you like. If you feel timid about spiciness, Try starting with a jalapeno without seeds. Always taste and adjust after you have allowed the salsa to sit for at least 4 hours. Medium Hot spicy- try jalapeno with seeds, or substitute a serrano, a slightly hotter pepper. All peppers have a different flavor and personality. Experiment to find what you like!
ALSO: If you chop an avocado into a bowl and add a few tablespoons of salsa, you have fresh, easy guacamole!

FASTER: Like i have stated above, You can make this recipe faster if you use a food processor. I don't really like using- but have a go at it if you want.

HEALTHIER: This recipe is pretty darn healthy. All fresh ingredients, raw, vegetables, etc. Just watch the foods you put it on!


Sunday, May 1, 2011

Crepes: I like Mine Fresh and Fruity!


Crepes


So, i was watching Julia Child's show on DVD, and i came across this recipe she uses to make tasty-looking dessert crepes. i also read about crepes in cooks illustrated recently, and i really wanted to try it.
so this is what came up with, i used julia's basic recipe, but i tailored it to fit two servings.  i want to experiment with  a whole wheat flour version, and maybe a creme friache batter.


i know from previous experiences at Crepe Restaurants in SF that i love Crepes with Chocolate Hazelnut Spread, Fresh Strawberries and Blueberries. i made these with a side of oven roasted potatoes and omelets, and it made a tasty breakfast as well as a memorable breakfast-for-dinner.


RECIPE
Makes about four 5" crepes, enough for 2 servings.
BATTER:
1 egg yolk
1/2 Cup Flour
1/2 tsp Salt
1/4 Cup Water
1/4 Cup Milk
1 1/2 TBS melted butter Plus more butter for cooking (Approx 1tbs)
Plus 1 TBS Melted Butter and 2 tsp sugar
FILLING:
3 TBS Chocolate Hazelnut Spread (Such as Nutella)
4 Med/Lrg Fresh Strawberries, Sliced
1/4 Fresh blueberries

Whisk flour and salt together. Mix in egg, water, and milk till you get a smooth batter. You can do this in a food processor too, but i don;t like dirtying a lot of dishes, and it is very easy to mix by hand. Set aside. prepare filling ingredients, and heat pan. Put enough butter in the hot pan to make a thin coating. pour batter in pan to make a thin layer, as shown in slideshow. cook about 2minutes, or until loose from pan when shaken. flip carefully. Cook on second side about 1-2 minutes. turn onto a plate. repeat till you use up your batter. Carefully spread chocolate spread onto crepe, fill, and roll, as shown. repeat, lining crepes up on an oven proof plate or dish, folded side down. drizzle or paint melted butter over tops of rolled crepes and sprinkle with sugar. Place under broiler and heat till sugar is caramelized, watching carefully, about 3-5 minutes. Served topped with creme friache or whipped cream.


 OTHER FLAVORS:
Wow! there are hundreds of things you could do with crepes once you have a pile on a plate to play with. The first time i tested this recipe, i did not have berries, and i used sliced bananas and chopped nuts as a filling, which came out really nice. if you try something and you love it, lemme know!

CHEAPER:
You can substitute peanut butter for nutella. it's definately a bit cheaper and more handy for most folks. you can also use frozen rather than fresh berries. for the batter, it is pretty basic, so it's very inexpensive.


FASTER:
You can make the batter a few hours in advance to save time. You may have to thin it again with a splash of water to get a nice pourable consistency. This will depend on the flour in your batter. Julia suggests making them ahead and freezing them, i have not tried this, and since i am not a fan of freezing food really, i probably won't.

HEALTHIER:
as i said at the top of the post, i am hoping to someday work out a whole wheat version of this recipe. i will post again when i do. Till then, you can use egg white rather than yolk, skim milk, and olive oil (or other healthful oil) rather than melted butter. substitute unsweetened nut butter such as almond or peanut for nutella, omit sugar topping step, and top with yogurt.


Wednesday, April 27, 2011

Bunuelos: Fried Sugary Fun!


Bunuelos


Crispy, addicting, sweet, and comforting- Bunuelos, pronounced "boon-whey-Lows" are traditionally made and served on New Year's. The dough is similar to flour tortilla dough, which is rolled out super thin, fried, and then sprinkled with cinnamon sugar. i used to make these every year with my grandma when i was a kid. She would always call me specially to help her out, because it can be tricky to fry and sugar bunuelos all at once.


RECIPE:
1/2 cup +2 TBS Flour
1/2 tsp salt
1/4 tsp Baking Powder
1 TBS Shortening (or coconut oil)
1/4 cup hot water
1/2 egg white
1/2 cup sugar
1 1/2 tsp cinnamon
    plus additional flour for rolling dough
    plus oil for frying, such as vegetable, peanut, or coconut

Whisk together flour, salt and baking powder. Add shortening and water, mix slightly, till water has cooled a bit. Add egg and mix well till it comes together into a dough ball. turn out to a lightly floured board and knead a few times to make a smooth cohesive dough. Press dough into a flat even disk, cut in half. Cut one of the halves in half, then cut each of those pieces into even thirds. Repeat with other Half of dough, forming 12 evenly sized pieces of dough. Now is a good time to get everything ready for cooking. Heat your pan with oil, medium high heat. Get cooling rack and place it over a plate this will drain off excess oil and catch excess sugar (You can also use a plate with paper towels). Mix you sugar and cinnamon together in a small bowl and put a small spoon in it. Okay, now your ready to roll. Knead a piece of dough into a small ball. Flour rolling surface lightly and rolling pin. Roll out as thin as possible. If i am doing these with out help, i like to roll out 2 or 3 before i begin cooking to give myself a head start. Fry till brown and crispy on both sides. Remove from oil, place on rack. Allow oil to drain a few seconds ( Place next round into oil), then sprinkle with sugar on both sides. Shake off excess sugar, and place on a plate. Roll another round, and continue. Keep in an airtight container for 3-5 days, though i doubt they will sit around longer than 1 day.


SERVING SIZE:  Two 4"disks. Serves 3.

OTHER FLAVORS: Though it is not something my grandma ever did, these are also traditionally served with a drizzle of honey. Which sounds good, i'll let you know when i try it.

CHEAPER: This is as cheap as it gets, folks. 


FASTER: hmmm. i am not sure there is a Quick way to fry a bunch of bunuelos. Sorry.


HEALTHIER: Fried foods are NOT health foods. This is a special treat!


Sunday, April 24, 2011

Spicy Ramen: Ramen With Intensity!


Today's Feature is....

Spicy Ramen!


HOORAY!

We are back in action with my new camera i got for my birthday! i hope you all are excited! i have so many new things to share with you! I will be cooking from my "Mock Kitchen" i set up in my cabin in Sequoia National Park, which is complete with a Mini Fridge, Double Burner Hot Plate and a Kick ass Deluxe sized Toaster Oven! (i know it's not an ideal setting, but i still make magic happen!).

Anyhow, about the recipe:
     This is a recipe i came up with after having a lot of trouble finding "Ramen" Packages That did not contain MSG and suited my taste. This recipe is inspired by a Korean Soup i like a lot called Yuk Gae Jang, Which is a spicy beef broth with shredded beef and mung bean sprouts. I did not have sprouts on the day i shot this, so it is missing that, but it still tasted fantastic.

Feel free to change this recipe in any way you like. 


RECIPE
1 quart (4 cups) water
4 cloves fresh garlic or 2tsp granulated
Spice Mix:
1/2 tsp Cayanne
2 tsp sugar
1/2 tsp red chili flakes
1 TBS Soy sauce + more to taste (Soy is used rather than salt in this recipe)
2 tsp vinegar (Cider vinegar shown, but you can also use rice or white.)
1 TBS sake or Mirin
2 Tsp Chicken Paste or enough Bouillon for 2 cups

Veggies:
1 cup sliced mushrooms
1/2 cup cubed tofu
1 cup Mung Bean Sprouts

1 block Ramen

Set pot on stove and heat to high. Pour in water. Press or slice garlic (Slice for milder garlic flavor, press for stronger flavor) and add to water. Measure out spices and add to soup. Add Mushrooms and spouts. Allow to simmer 1 minute. add cubed tofu and ramen. Cover and cook for 5 minutes, till ramen is soft. (other brands of ramen noodle may require less cooking time. start with 3 minutes and taste every minute if you are not sure.) Serve hot! Top with Sliced Green onion if you like.

SERVING SIZE
1 Bowl, This recipe serves 2.5 or so.


 OTHER FLAVORS:
This recipe is easy to modify how ever you like. here are some ideas that i have tested.

Milder Ramen:
Substitute you favorite chili powder for cayanne.

Chicken Ramen:
Substitute Black pepper for Cayanne and leave out chili flakes.
for veggies, use 1/2 Cup Canned or frozen corn (if using can, add water from can to enhance flavor of broth) and 1/4 cup frozen peas.

Japanese Style recipe:
Substitute 1 1/2 tsp Bonito Dashi Powder for Chicken paste, omit cayanne. Top with Saute'd shrimp or fried egg.

CHEAPER: Dude, this recipe is cheap already, but if you must, you can make just soup with ramen and top with a fried egg instead of cooking veggies and tofu.

FASTER: if you like this recipe and want to make it all the time, you can double or triple the spice mix and mix it into a paste, and stir it into hot water with ramen later on to save time. i have not tried this, but i thought about it, this recipe is fast enough for me as is. if you try it, lemme know how long that lasts.

HEALTHIER: This soup is super healthy, it can be a tad high in sodium, so that would be the only thing i would cut back on. ( think soy sauce and chicken paste.)

VEGETARIAN:
Omit chicken paste, and this is the perfect vegetarian lunch.


Saturday, August 21, 2010

Easy Blue Cheese Dressing: Your New Secret Weapon!

To Dress, To Dress!


   This recipe is a great way to use up that leftover blue cheese from the party you threw. In my experience selling cheese, i have heard many people complain that when they bought blue for the party, no one really ate it. This could mean that these people need to find more adventurous friends, but it also definitely means they have blue cheese leftovers to deal with.  I like this as a way to stretch my blue cheese money further.  A nice blue cheese can be kinda pricey, and this simple dressing recipe can actually be your secret weapon for lots of dishes. 

   Because of the yogurt base, this dressing melts into a nice creaminess over hot items. I once made this, added a pinch of chopped fresh dill, and spread it over freshly grilled burgers in lieu of cheddar. The result was amazing!  How 'bout blue cheese dressing drizzled over saute'd mushrooms as a side dish for steak? Or mixed with mustard powder and tossed instead of mayo into your macaroni salad? Or an easy sauce for ravioli? Spread over corn on the cob! Too hot to cook today? Try it drizzled over shredded carrots as a cool, crunchy, quick and easy side dish.
Anyway, please be daring! and send me pictures!


Easy Blue Cheese Dressing
Makes  about 1 cup

2-4 oz blue cheese (remove natural rind from stilton style blues), crumbled
1/2 cup your favorite plain yogurt
1/2 tsp fresh ground black pepper, (more or less according to your taste)
*** optional seasoning ideas: dill, mustard powder, honey, red pepper flakes, etc.) i don't usually add salt, blue cheeses are usually very salty. But, of course, that is up to you.

Crumble cold blue with a fork, add yogurt and seasoning. Mush it together with a fork for about a minute. Whisk till smooth and fluffly. Keep in an airtight container in the fridge for two weeks or longer.  Shelf life will depend upon the freshness and quality of the ingredients used (taste before each use after 10 days).


Saturday, August 14, 2010

Home Roasted Coffee: Remove Your Smoke Detector

Yes, Folks. 
Roast Coffee yourself!


Today's Post is mostly just for fun, something we did in the kitchen that was kinda awesome. 
I have always wondered what happens to coffee to make it taste so good. Roasting coffee is a simple process, but very difficult to master. But, like anything else in the kitchen, i think it can be done with practice. Anyhow, i am no master. Only curious. Roasting your own coffee can save you some money once you get good at it. I have become somewhat of a coffee snob, so only the best Fair Trade/ Organic fresh roasted beans will do. This can be a pricey habit. We got this coffee from a local place that also retails online called Sweet Maria's. They have great prices, good quality, and good ethics. Check their website (link above) for Roasting tips and other coffee stories. 

Ok, on to the show. First i have a slideshow of the first half of the roasting, but when it started to move fast, i shot a video. hope you enjoy!

And also:


Tuesday, August 10, 2010

Homemade Flour Tortillas: Make 'em Yourself!

Yay!
Homemade Tortillas!


    This is a fairly simple recipe, but it does take a little practice to get it perfect. You will be pleased with the results if you give it a try! Homemade tortillas for burritos, tacos, quesadillas, or just as a side dish to any mexican food. 
   My grandma taught me to make tortillas from a very young age. I remember practicing rolling in first grade. My grandma was often disappointed in my lack of ability to produce round tortillas, and would scold me with her story about how she learned to make them round. " If i messed up, my mother would hit my hand with the rolling pin. It is a fast way to learn." Horrified, i tried my best. My grandma's good humor and tender patience always allowed for my mistakes with out any bruised knuckles, but it is something i still think of every time i roll.
   Anyhow, try your best, and send pictures if you try it yourself!


Tortillas
makes 4, serves 2

1 cup flour, plus more for dusting
1/4 tsp baking powder
1/2 tsp salt
1 tbs Shortening
1 tbs Olive oil
1/2 cup HOT water (not hot from from the tap. heat in microwave or kettle)

Mix flour, salt and baking powder. Add shortening, oil, and water. mix till combined, forming dough into a ball. Knead for about one minute. Allow Dough to rest for ten minutes. Divide dough into 4 even pieces. Form each piece into a ball, and roll out on a well dusted board with a well dusted rolling pin. Cook on a dry clean skillet over medium high heat. Poke holes in any large bubbles that form for even cooking. Cook about 30 seconds on each side.  Serve hot.  Unrolled balls of dough will keep in an airtight container at room temp for about 3 days. You can also roll and partially cook tortillas, and keep them in a zipper bag in the fridge for about a week, or freeze for a month. 

Next time in iliea's Kitchen:

Saturday, August 7, 2010

Chorizo: Mexican Breakfast Sausage

Chorizo


     So, here's the thing: Chorizo has always been a guilty nostalgic pleasure for me. Mexican Sausage, often including questionable parts of the animal and far more questionable amounts of fat. Buy some from the store, cook it up, and you get a small pile of grainy "meat" drowning in a pool of bright red melted fat. *shudder. Well, i have tried to combat this myself in the past, and a solution for a long time had been to cook it up, drain out the fat with a wire sieve, then return the "meat" to the pan to scramble with eggs. Having collected this drained fat many times, i know that once it cools, it turns into a pale orange goo. I had a hard time not imagining that the breakfast i had just eaten was now a pale orange goo, clumped up somewhere in my body. *again with the shudder. Heavy, fatty, and kinda dirty, but the nostalgic memory was worth this price. Grandma often made chorizo for me, and i have grand memories of saturday mornings finding her in the kitchen, rolling out tortillas, with a pot of beans bubbling away on the stove. She would hand me a basket and ask me to go bother the chicken for some eggs. Grandpa used a meat grinder and made ground pork out of clearly identified parts, and grandma would turn that into the most delicious chorizo.  *sigh.
     Ok, so these days, store bought just doesn't cut it for me. But i can't help my wanting for the chorizo of my childhood. So i wrote my uncle, and asked him if he knew how to make it. After following his vague recipe, and tweaking it, and testing it a bunch, i have finally made the chorizo of my memory. 


Other benefits from making your own chorizo other than deliciosity and nostalgic factors is expense and health.  Fresh ground pork is super cheap, as are beans, flour, and eggs. You can make a weeks worth of substantial breakfasts for 2 for not too much money. Adding potato to the scramble is a tasty way to get your chorizo to stretch even further. I buy in bulk flour, spices, and beans... Saving LOTS $$$. Health wise, if you make it yourself, you get absolute control over what goes into it. I have found that buying fresh ground pork from a clean and trusted butcher shop contains little fat compared to the Glowing red pool i got in store bought chorizo. I tend to buy organic, so as far as i know, this is the only way to get a cleanly organic mexican chorizo. 

Coming soon is my tortilla how to. Make your chorizo!


Chorizo Recipe:
serves about 10

1/2 lb ground pork
1/2 cup white vinegar
1 tsp granulated garlic or 3 fresh cloves, minced
3 tbs chili powder
1/2 tsp salt
1/2 tsp fresh ground black pepper
1 tsp ground cumin

If you like it spicy, you can also add:
1/2 tsp cayenne pepper
1 tbs red chili flakes

Mix all ingredients together with a whisk or spatula. Do not mix with your hands, the chili could make your skin irritated. Pack into an airtight container and refrigerate for 24 hours. Chorizo will keep in your fridge for two weeks, more or less.

Chorizo Scramble with potatoes
for 2

1 small yellow potato, cut into 1/2" cubes
1 tbs olive oil
salt and pepper to taste
dash red pepper flakes optional
splash of water (about 1 oz)

2 heaping tablespoons chorizo
2 eggs

Heat a skillet over medium high heat. Add olive oil, potatoes and season. Cook, tossing occasionally, about 8-10 minutes. add water, cover. lower heat to medium low. Steam the potatoes till the water evaporates, about 5 minutes. Remove cover and toss the potatoes to dry them out a bit. Check to make sure the potatoes are soft. If they are not, add another splash of water and repeat steam process. Push potatoes to the edges of the pan. Place chorizo in the center of the skillet, and flatten. cook over medium heat, stirring, for about five minutes. Toss potatoes together with chorizo. Add eggs, scramble. Serve with beans and tortillas, or roll into a breakfast burrito.

Next time in iliea's Kitchen:

Tuesday, August 3, 2010

Pasta Primavera: iliea Style!

Pasta Primavera!

From Pasta Primavera


Hello, everyone. i know it has been a very very long time since my last post, and i apologize. Summer has a way of making me forget to document my kitchen adventures. I have been taking pictures, just not all the time. Anyhow, in the next few weeks i will be trying to play catch up in ilieaskitchen. 
First up is this Springtime recipe i did in May. The Peas were big, fresh and beautiful, and they went perfectly with the new recipe for alfredo sauce i been so in love with recently. 
Traditionally, Pasta primavera is fresh spring veggies with pesto. I used fresh sweet english peas, asparagus, and spinach, but you can substitute any green veggies you like. As most of you know, but some of you don't, but i'm actually allergic to basil, so even though it is delicious, Pesto is OUT. So this is my version, pesto free, of Pasta Primavera. Enjoy!


Pasta Primavera
Serves 2.

1 cup fresh shelled english peas
1 cup 1 inch pieces asparagus
1/2 cup blanched and chopped spinach
1 cup chicken broth or 1 cup water and bouillon, or vegetable broth
1/2 cup half and half
minced garlic, 3 or 4 cloves according to your taste
1 tsp red pepper flakes, plus more for garnish
1 cup freshly grated parmigiano reggiano
1 egg yolk
1- 8oz Package Fresh Spinach Fettuccine

Get a large pot of water on the stove to cook your pasta in. Prepare vegetables: Cut and blanch spinach in chicken broth, reserve blanching liquid. soaking in cold water bath as shown. squeeze, chop, set aside. bring broth back to a simmer, and add peas and asparagus. cover and simmer till bright and soft, about five minutes. Meanwhile grate cheese and mince garlic, and begin to cook your pasta. follow package directions, cook one minute less than called for. remove veggies from broth. add half and half, garlic, and pepper. bring back to just a simmer, remove from heat. in a separate bowl or cup, add egg yolk and a spoonful of hot cream sauce. stir. repeat 4 times. add egg mixture to sauce, whisk well. drain cooked pasta. add half of the cheese, and all of the sauce. toss well, cover and let stand five minutes. stir in the rest of the cheese and the veggies. serve, garnishing with extra cheese and pepper flakes.

Next time in iliea's kitchen:
Monday, April 12, 2010

Hand Rolled Fettuccine: Chicken and Alfredo Sauce

Hand Rolled Fettuccine

Hand Rolled pasta is a great treat, and my favorite thing about it is that you don't need any special equipment to make it. All you need is a large, clean, flat space, and a rolling pin! Even the ingredient list is simple, flour, egg, water, salt. Once you learn to make pasta by hand, you'll love how tasty and rewarding a treat it is. Experiment with uses and shapes! This how to has been used in iliea's kitchen for chicken noodle soup and ravioli!

I went to a friend's house and taught her how to make hand rolled pasta, then we both learned how to make Alfredo from Chef John. I have included the video we used to make this wonderful dish. It was maybe the best dinner I have eaten so far this year! We were both very pleased! I hope you try this yourself, but maybe if you beg me enough I will come and make it for you...
First a few pictures of our fabulous spread...


And now on to our fettuccine demo!


Pasta
Serves 2

1 cup flour
1 egg
2 tbs water
1/4 tsp salt

place flour on a large, clean flat surface. Create a well with your fist. Beat egg gently with water and salt. Pour egg mixture into the well. Using a fork, continue to beat the egg in the well, drawing in flour from the sides and incorporating it slowly into the pasta. Once a stick dough begins to form, remove fork, and cover dough with flour, as shown. press flour into dough. Repeat several times till a ball begins to form. Knead dough until smooth, about 2 minutes. Form dough into a ball, cut in half. Roll out as desired or as shown. Dry pasta for at least 10 minutes. Bring a large pot of salted water to a boil. Add pasta, reduce heat to medium high. (rapidly boiling fresh pasta can break it). Cook to desired texture, 5-8 minutes.

NOTE: Today's demo features guest Photographer Sabrina Kay! Thanks for the great pictures, Sabrina!

Here is the Chicken Alfredo how-to video we followed, also see the full blog post here. Props to Chef John for a fabulous recipe! Thank you!


Thursday, April 8, 2010

Tostadas!--: No One Can Tell They're Vegetarian

Tostadas!


I love a quick tostada dinner! i can eat like three of these and be happy! You got everything you need, veggies, greens, dairy, whole grains, protein... and i use healthy olive oil to refry the beans and to "fry" the tostada shells... using my fast and simple baking technique.
Traditionally, you fry the tortillas in vegetable oil till they are crunchy. The method i use here is a lower fat no fry method, and it is also much faster because you can bake many at a time. Simply spread on a thin layer of olive oil to both sides of the tortillas, then bake! So easy! This technique also makes great and simple tortilla chips, simply coat the tortillas in olive oil, stack them up, and cut into wedges or strips, then bake. Try it out sometime!

Also i have included a demo on how to re-fry beans, in case you needed to know. Here i made a super healthy and vegetarian olive oil re-fried beans, but if you wanna be more traditional, they taste great with bacon fat! I quit buying cans of pre-refried beans, they tend to be pasty in texture, and pretty bland. Just don't have any character. It is not too hard to re-fry beans. I like to use pinto beans, here i used canned beans, but it is pretty easy to make them yourself. It is certainly cheaper. I will post a from scratch beans how-to in the not too distant future.

The cheese i used today is called Landaff, From New Hampshire, aged at The cellars At Jasper Hill.

Well, top your tostadas with whatever you fancy, i like this fast and simple meatless version. Surely you could grill some chicken, reheat leftover roast, shredded cabbage, tofu crumbles avocados, onions, tomatoes, get creative!


Tostadas

For 2

6 corn tortillas
2 tbs olive oil, divided
1 can of pinto beans, do not drain!
dash of salt

your favorite toppings, mine were:

Fresh Spicy salsa
grated cheese
Baby arugula and baby romaine

brush or rub a thin layer of olive oil evenly to both sides of the tortillas. Place on a single layer on a large baking sheet. Bake in a 425* oven for 10 minutes or till crispy. remove from oven. Heat a fry pan over medium high heat. Add olive oil, and the whole can of pinto beans, (liquid too!) . Bring to a simmer. Lower heat, and smash the beans till smooth. Season with a bit of salt, simmer till thickened. Assemble tostadas as shown.

Enjoy!

Next Post:
From alfredo

Thursday, April 1, 2010

Burgers: Blue Cheese and Wine Reduction Sauce

NO Foolin' ....It's Hamburger Time!!


    Though parts of me aren't as celebratory, i am an american after all, and my love of the good ol' burger is proof. This ain't just any burger, though- Perhaps it is very californian. Or, Specifically, very San Francisco. Anyhow, this Burger, more than any of these things, is very me, and very very much how i eat my burgers, every time. 
    Anyhow, back to the burger... I start with the nicest ground cow i can find, organic grass fed for peace of mind. Blue Cheese. Some nice saute' mushrooms, such as the hedgehog mushrooms i used here, but crimini work well too. I put my burger on a rustic roll from the local bakery, but any hardy bread will do. i serve the mushrooms with a reduction sauce as a side dish, but you can put it in your burger if you are brave and have a very big napkin.


Hamburger TIME!

Serves 2!

1/4 LB Ground Cow
3 Tbs Soy Sauce (1 oz)
3 Cloves Garlic, minced or pressed
1tsp ground pepper
2 oz blue cheese, crumbled (shown here, Buttermilk Blue Affine', Roth Kase, WI)

1 lb hedghog or other mushroom, prepped.
1/4 cup Wine or Mirin
1 tsp balsamic vinegar
1 tsp (loose) dried thyme


Crumble Blue Cheese, set aside. Mix Ground cow with soy, garlic, and pepper. Mix Very well, with hands or spoon. Form into a ball, patting gingerly to remove air bubbles. Cut ball in half, form into two evenly sized patties. Heat a heavy skillet on high to very hot. Test pan for readiness by putting a drop of water in it, if it hops right back out, it is ready! Place patties in pan. cook to your liking. about a minute before the burger is done, add cheese, cover. After one minute, place each patty on the bun it belongs to. Allow to rest. Meanwhile, in the same pan that you just made burgers in, add mushrooms and saute'. Add wine/mirin, balsamic, and thyme. toss to coat, cook till mushrooms soften, about three minutes. serve.

Monday, March 29, 2010

Corned Beef and Cabbage: A March Favorite

Well, it's still March, so it's not too late to post this, is it?


simple directions for a simple food. Corned Beef is actually really hard to make from scratch. It is a beef brisket that is preserved in a brine... sometimes salt would form large clumps on the outside of the brisket, and that's why it's called "corned" beef. Not corn like corn-on-the-cob, more like crusty-lump-on-your-uncle's-foot corn. See? now you get it. Heh.

anyhow, here is the how to slide show, and below is the recipe. Enjoy!


serves four (or two with lots of leftovers!)
3 lb corned beef brisket (mine came pre-seasoned, yours may have a seasoning packet included.)
1 onion, quartered
5 or 6 red potatoes, quartered
4 or 5 carrots, cut into 2 1/2" pieces
4 celery stalks, peeled and cut into thirds
1 large head of cabbage, quartered

water for cooking.

place onion, carrot, and celery in a large pot. place beef on top. fill with enough water to cover. bring to a simmer, skim foam from top. cover and simmer for 2 hours. after two hours, add potatoes. cover and simmer 30 minutes. add cabbage. cover and simmer 30 minutes. remove corned beef, allow to rest for 15 minutes before cutting. great with rye bread!

Sunday, March 14, 2010

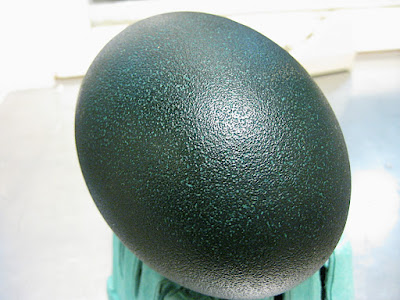
EMU EGG!

Food Report:

Emu Egg!

On occasion i like to picture some of the food oddities i encounter from time to time.


This was left for a co-worker of mine as a gift.

ain't it beautiful?

Friday, March 12, 2010

Macaroni Salad: Simple Side for Tasty Foods

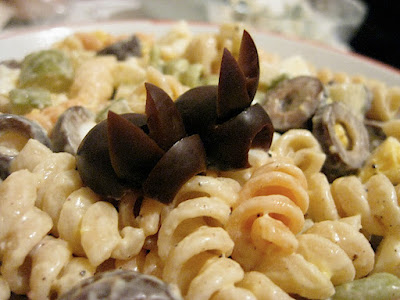
Macaroni Salad
Noodles with Mayo make a tasty combo


Here is my take on my mom's recipe. Just like i had as a kid. super simple.


Macaroni Salad.

2 cups pasta, cooked, rinsed, cooled.
2 hard boiled eggs, peeled, diced
3/4 cups diced dill pickles
3/4 cups sliced black olives
1/3 cup mayonaise
1 tsp whole grain or dijon mustard
1 tsp fresh ground black pepper, more or less to taste


combine all ingredients. garnish with olive bunnies. or parsley. or BBQ ribs.

NEXT RECIPE:

Saturday, March 6, 2010

Tempura Soba: Japanese Noodles and Soup

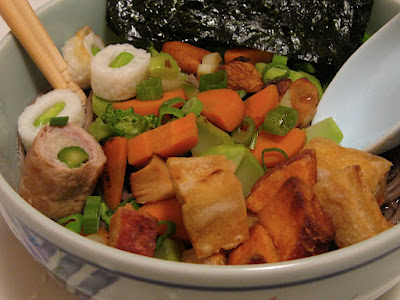
Vegetable Tempura Soba

Buckwheat Noodles with Soup and Fried Veggies

    Yay! a super healthy, yummy hot soup. Traditionally served for New Year's in Japan, Buckwheat noodles are healthy and tasty. Today i will show you my method for cooking this with lots of fresh veggies, and a simple tempura. All with things you probably have available to you wherever you are. i promise (see below for substitutions and hints.).

yay! enjoy!


Serves 2

1 green onion, sliced
1 carrot, sliced as shown,
1 broccoli stalk, sliced as shown
1 sweet potato
2 or 3 oz of firm tofu
1 tbs flour for dredging
2 tbs flour+ 2 tbs water for batter
1/4 cup oil for frying, grapeseed, peanut, or vegetable.
1 bundle of soba noodles
1/4 cup soba sauce
1/4 tsp dashi
1 cup water
Shichimi, (optional) -to taste


start by prepping all the veggies and tofu as shown. Hint: Toss out the thick fibrous stem end of the broccoli, but cut up and use the tasty stem. Set Sweet potato chunks in a small strainer, and place in boiling water for about five minutes, till soft, but not mushy. This will quicken the fry time they will need to cook through. Remove from water and drain well. Heat a large pot with enough water to boil noodles. Heat a small skillet or shallow pan on high heat with oil. (about 1/4" of oil, the smaller the pan you use, the less oil you'll need) Sprinkle sweet potato pieces and tofu with flour, toss to coat evenly. Mix tempura batter and coat tofu and sweet potato in batter. Lower heat in pan to medium, and add tofu and sweet potato, spacing evenly apart so they don't stick together. fry for two minutes per side, or until crispy. Remove from oil and drain on paper towels. Once water for noodles boils, add noodles, and cook according to package directions. When the noodles are cooked, rinse well with very cold water. Drain. place noodles in the serving bowl. Heat soup mix, water and carrots, broccoli, mushrooms, and green onion in a saucepan. bring to simmer and cook for 5 minutes. Pour soup over noodles. Top with your tempura. Garnish how you like, if you can find some i recommend Shichimi powder, a spicy japanese pepper traditionally used for this dish.


if you cannot find soba sauce (don't even really bother looking unless it's super convenient, i.e. asian grocery next door, whatever) you can make your own with simple things you should have in your home, or are easy to find anywhere and is very affordable.
2 tbs soy sauce
2 tbs sake (or 2 tbs mirin and no sugar)
1 tsp sugar

also, if you cannot find dashi (which i highly recommend, it is super tasty) you can try another light soup base, like pork bullion, or even chicken.
yay! enjoy!

Wednesday, March 3, 2010

Your Kitchen!: Nat Makes Handmade Ravioli!


Yay!
This is Handmade Ravioli, made by loyal fan, Nat O. on Dec. 5th, 2009. Thank you Nat!


Tuesday, March 2, 2010

Cream of Wheat: Hot Wheat Farina

Hot Wheat Farina Cereal
Cheap! Filling! Delicious!


Hearty, Hot, and inexpensive. Not to mention simple and quick. Prep time = 5 minutes! One 1LB bag From Bob's Red Mill (organic) Costs about $3.50. at 3TBS per serving, That's about $.06 of cereal per serving! This is something grandma made for us frequently, and it was one of my favorite things that she made! i hope you try this yourself very soon!


Cream of Wheat Farina Hot Cereal

Serves One

1/2 cup water
3 tbs Wheat Farina or Cream of Wheat
1/4 cup milk
1/4 tsp salt

Optional toppings:
butter
evaporated milk
Brown sugar

In a small saucepan, add water, salt, cereal, and milk. Turn on heat to medium low. Bring to a simmer, stirring constantly. Simmer till thick. add more or less water for thicker/thinner cereal, experiment to see what you like. Top with butter, milk, and sugar as shown. enjoy!

NEXT POST:

Tempura Soba!

Friday, February 26, 2010

Beef Stew: Cow, Wine, And Veggies!

Beef Stew
With Wild Mushrooms and Red Wine

    I love Beef stew. This recipe is for fast stew, you get fall apart meat in only 2 hours. Also, this recipe is embellished with red wine i had leftover, and wild mushrooms that were handy. These are nice to have, but are not necessary. Also, this stew is seasoned very simply with two herbs. I like to shop organic, but little jars of dried herbs cost so much money! What i do is buy a bunch of fresh herbs, and dry it myself. Shown in this recipe is a few sprigs from a bunch i've been using since thanksgiving. The red wine is one of my favorites, not too pricey, but tasty, that had been open a few days. i hate throwing things out, so i cooked it!

To Dry Herbs:
Spread fresh bunch onto parchment. Place in oven (turned off) for a few days, or till completely dry. You can also dry them any where that has dry air (not humid). This works well for thyme and bay leaf, some herbs are not as good to use dry, see what works for you.


Beef Stew
Serves 4-6

1 Lb. beef ( NY Steak or Top sirloin), diced into 1" pieces
1 large yellow onion, diced, 1/2" pieces
3 cloves garlic, minced
2 cups red wine
1 quart of beef broth (or water plus 2 tsp salt)
1 Thyme bouquet garni
2 bay leaves
1 tsp fresh ground black pepper
1 lb. carrots, sliced, 1" pieces
1 lb. celery, sliced, 1" pieces
2 lbs. potatoes, diced. 1-2" pieces
1 1/2 lbs. Mushrooms, trimmed, sliced if very large

In a heavy pot, heat on high till very hot. Add meat in a single layer, to sear. cook till browned, do not stir. Once browned on one side, toss, add onion, and brown till onions are soft. add garlic, heat till aromatic (about 1 minute). Add wine, stirring to remove browned bit from the bottom of the pan. Add Thyme, Bay, and Pepper. Lower heat and simmer till reduced by half, about 10 minutes. Add broth, cover and simmer 1 hour. Add potatoes, celery, and carrots, stir, cover, simmer for thirty minutes. Next add cornstarch, stir. Add mushrooms, stir. cover and simmer about 15 more minutes, till mushrooms are soft. Enjoy!


Next Post:

Hot Wheat Farina Cereal Breakfast


Tuesday, February 2, 2010

Cashew Brittle: Nuts About Candy!

Cashew Brittle
FUN To Make, Sweet To Eat!


This is one of the easiest sweet treats you can make! All you need to live a life of candy making is a fancy (and inexpensive) thermometer, and a steady hand. Hard crack syrup is incredibly hot and sticky. Getting hot syrup on your skin is no fun, so please be careful. You will be so proud of yourself once you do it! This also makes a great gift, i often give out lots at christmas time. This was my grandma's absolute favorite. She loved to eat peanut brittle. i use cashews, but you can experiment and use any sort of nuts that you like. Well, try it and enjoy!


Brittle.

1 cup sugar
1/2 cup light corn syrup
1/4 cup water
1 cup nuts of your choice
2 Tbs. Butter
1 tsp Baking soda
1/2 tsp Vanilla

Butter a large cookie sheet. Pour Sugar, corn syrup, and water in a large heavy pan. (use a medium or LARGE pan or sugar can boil over and spill. NO FUN) Clip your candy thermometer on. Place over High till till boiling. add nuts. boil to 304* Do not stir. remove from heat. add vanilla, baking soda, and butter. Whisk well. Working quickly, spread to and even and thin layer on prepared pan. allow to cool, break into pieces.

Next POST: (TBA!)
Related Posts with Thumbnails